Who's Online
3 registered (Hiimjimmeh, dirtjumper895, 1 invisible), 34 Guests and 1 Spider online.
Key: Admin, Global Mod, Mod
Page 1 of 3 1 2 3 >
Topic Options
#289751 - 03/11/12 10:53 PM *** sticky *** AK-47 Build Tutorial - Very Pic Heavy!!
Togeneral98 Offline
Resident Gun Nut

Registered: 08/03/10
Posts: 1796
Loc: Campbell County
City or County: Evington
Ok guys I was asked to get a tutorial about bending a flat and building up an AK-47 from a parts kit...so here it goes.

I tried to document every little bit with detailed pictures of what I am doing and how I'm going about it. Unfortunately this will have to be broken up into alot of posts as I'm only allowed 6 pics per post...

In this 1st stage I am bending the receiver and putting in the front trunnion (phone camera died so I had to stop here - don't want to shaft you guys out of any important pictures!)

So we start with our parts kit and our flat...


Then we line up our flat onto the small dowel pins on our bending jig (the little pins inside of the magwell opening and one in the trigger guard rivet hole - as seen in the previous picture)


Now we bolt everything down (notice that the bolts are not all equal distances apart - this thing only goes on one way!)


Once everything is tightened down this jig (from AK builder) will slightly bend the flat in the opposite direction - this is so that once the bending is done everything will be square as sheet metal will flex back from 90º to say 82º (Trust me on this one)


Ok my 6 pic limit is up....next slide....
_________________________
Wes

Top
#289753 - 03/11/12 11:01 PM Re: AK-47 Build Tutorial - Very Pic Heavy!! [Re: Togeneral98]
Togeneral98 Offline
Resident Gun Nut

Registered: 08/03/10
Posts: 1796
Loc: Campbell County
City or County: Evington
The beding jig consists of 2 parts...a base part (die) and a top part (punch) The flat is attached to the punch part.


Now remember I said that the bolts are not all the same distance apart this is where that matters big time! The Die has counterbores cut into the bottom of it to allow the bolt heads to not get smashed when you are bending the flat. MAKE SURE THESE ARE LINED UP OR YOU WILL HAVE A VERY BAD DAY!


Ok now lets bend this sucker right???
No, we have to lube up the flat and the die or otherwise you will score the crap out of the side of your receiver - so lets slather this thing with some WD-40 (or other good oil - hell I've used canola oil before...)


Ok now make sure there aren't any chips or dirt or anything else on your receiver flat. Now lets bend this bad boy!


6 pic Limit reached... next slide....
_________________________
Wes

Top
#289756 - 03/11/12 11:09 PM Re: AK-47 Build Tutorial - Very Pic Heavy!! [Re: Togeneral98]
Togeneral98 Offline
Resident Gun Nut

Registered: 08/03/10
Posts: 1796
Loc: Campbell County
City or County: Evington
Ok now we have to get this thing out of the die (and believe me it is in the die hard, you aren't just gonna pull it out!)

Well if we flip the die block over we see that Curtis at AK Builder has already thought about it (did I mention the right tools make all the difference!?)
There are two large set screws in the bottom of the die that, when tightened, will "push" the receiver out of the die block.


We just keep on "pushin" until the receiver comes out! Now we loosen our bolts in our tie down bar (The bar we put on it to hold the flat in position) I used a vise to hold the punch as it makes this a good bit easier.


Ok once the tie down bar has been removed you will slide the receiver off towards the front (otherwise you won't be able to get it off - the magwell dimples will hit the sides of the punch)

Now we have our receiver!


(They will never be 100% stragight and square at this step - don't worry about it as the trunnions and the center support will fix this)

Ok now we grab the front trunnion and clean it really well (Mine was already demilled so I won't be going over that step here but I'll get the demilling tutorial on my next build - Thanks to Whatacountry.com!)

I am using acetone and a nylon brush to clean the trunnion INSIDE AND OUT!


Now we can test fit the trunnion into the receiver!


Looks just like an AK doesn't it crazy


Edited by Togeneral98 (03/11/12 11:17 PM)
_________________________
Wes

Top
#289768 - 03/11/12 11:30 PM Re: AK-47 Build Tutorial - Very Pic Heavy!! [Re: Togeneral98]
Togeneral98 Offline
Resident Gun Nut

Registered: 08/03/10
Posts: 1796
Loc: Campbell County
City or County: Evington
Alright now one of the fun parts of the build! we're going to drill our own trunnion holes!!! Yippie!

This is where another AK Builder jig comes in handy (yes you can do it without this jig - start with a small drill bit and then work your way up, but this is more precise and lets face it no one wants to screw up their just bent receiver!)

Ok so we want a drill press, the correct sized drill bit (just big enough to fit the trunnion hole without dragging or cutting), and the front trunnion.


Check!

Now we place the trunnion on the jig with the included aluminum spacer block underneith it. We then use the drill bit to "line up" the holes of the trunnion and the drill - lock the jig down very tight as sometimes the receiver will fit very tight on the trunnion.

Here is the very forward hole on the trunnion lined up.


Now we slide the receiver onto the trunnion and line it up flush with the front of the trunnion.


While holding the receiver steady (if it's a loose fit on the trunnion) we drill the first 2 holes (make sure the collet, the red thing, isn't going to get drilled through)


Ok now we loosen the collet (red thing) and remove the receiver from the trunnion (this may be a little tought especially if you have a less than stellar drill as it will leave a burr on the inside of the receiver - just work with it til it comes off)

Now we setup the trunnion back in the jig and setup on the next set of holes using the drill bit to line everything up.


Now when we put the receiver back on and line up the receiver with the trunnion we will put a rivet into the hole we already drilled. This will help to ensure that the receiver will not move out of place and we end up with holes that don't line up.


6 pic limit reached...next slide...
_________________________
Wes

Top
#289771 - 03/11/12 11:43 PM Re: AK-47 Build Tutorial - Very Pic Heavy!! [Re: Togeneral98]
Togeneral98 Offline
Resident Gun Nut

Registered: 08/03/10
Posts: 1796
Loc: Campbell County
City or County: Evington
Ok now we drill it!


Once again loosen the collet and remove the receiver (working around the burr on the inside - we'll take care of the burrs later)

Now setp on the last set of holes in the trunnion (this set is easy to get off square as you have a greater chance of rocking the trunnion - take your time and make sur the drill bit passes easliy through BOTH holes!)

Once you have them lined up as before...drill 'em!


Ok! Now we're getting somewhere!

If we look on the inside of the receiver we will see the burrs that maight have made getting the trunnion off a little difficult - lets fix those little baddies!


Break out the dremel and grind down the burs (try to grind evenly and keep it smooth - just because it will be covered doesn't mean you can skimp on effort here!) I find that the little chainsaw sharpening stone works well for this (besides I'll never use it for it's intended purpose anyways!)


(Hmmm I don't seem to have a pic for this part although I thought I took one...moving on) FOUND THE PIC!


Well now we have some burrs on the outside - yes I know we could just "dremel them off too" but that won't look anywhere near as pretty plus we have to chamfer 2 of these 6 holes so we might as well clean the burrs off with a countersink (or a center drill in my case)


Now lets see what we've got...


Now we don't want a really heav chamfer on the front holes just the back ones (if you look at the trunnion you'll see that the rear holes also have this countersink - there is a reason for this)


6 pic limit reached...next slide...


Edited by Togeneral98 (03/12/12 12:22 AM)
_________________________
Wes

Top
#289774 - 03/11/12 11:59 PM Re: AK-47 Build Tutorial - Very Pic Heavy!! [Re: Togeneral98]
Togeneral98 Offline
Resident Gun Nut

Registered: 08/03/10
Posts: 1796
Loc: Campbell County
City or County: Evington
Lets look at our rivets real quick...


Here is where all of these rivets go...


If you look closely you might see a few different types (moving left to right)
You have the 2 long rivets which are for your rear trunnion, you then have 1 short rivet which goes into the single hole on the rear of your trigger guard, next you have 4 rivets which will go into the front of your trigger guard (these are the same type of rivet as the front holes on your front trunnion), which brings me to the rivets that are left at the rear portion of your front trunnion. These 2 rivets are called swell-neck rivets and they MUST go into the bottom 2 holes of the front trunnion.

Here is a close up of the differences on these 2 rivets (the one on the left is the swell next rivet while the other is either one of the 4 front trigger guard rivets or one of the 4 rivets that will go into the very top front of the front trunnion)...


The countersink that you are going to cut on the bottom 2 holes of your receiver will help to allow these rivets to sit flush - or else it will look stupid and your friends, family, and co-workers will be ashamed and you will never be asked to another barbeque ever! ... Don't be that guy!

So now that we have slightly chamfered the front holes and put a larger chamfer on the lower holes (check with the rivet to make sure they all look right) there may be a very slight bur or rolled edge - now we can take care of it and at the same time finish a step to help our finish adhere!

I use a sanding block that feels about 120 or so and go over the entire receiver to help knock off that edge.


Now she looks like this...


Ok, at this point I test fit my trunnion by lining up the front of the receiver flush and clamping it down with a c-clamp.


Now I've learned that since we used a drill bit undersized to line up and drill the holes in the receiver I now have to step up to the correct drill size and redrill the holes to get everything lined up perfect..

I just go back through and touch up each set of holes and then we are off to rosie the riveter!

But...

6 picture limit reached...see next slide...


Edited by Togeneral98 (03/12/12 12:24 AM)
_________________________
Wes

Top
#289782 - 03/12/12 12:20 AM Re: AK-47 Build Tutorial - Very Pic Heavy!! [Re: Togeneral98]
Togeneral98 Offline
Resident Gun Nut

Registered: 08/03/10
Posts: 1796
Loc: Campbell County
City or County: Evington


Well not really Rosie (at least I thought she was better looking in the posters!) but she'll have to do...


Here we have the ram arm, 2 threaded ram heads (one concave and one flat - we'll use both on the front trunnion) and 2 sets of lower tools (I have no idea what to call these things, but one is concave and it will hold the head of the rivet to keep it from being deformed and the other tool is used for pressing in a countersink - but we already did that so we won't be using this tool)

Here are the tools we will be using for the front 4 rivets - the flat tool and the concave lower tool to hold the rivet head and keep us from crushing it flat.


Now we put our first rivet in and set the head of the rivet in the lower tool (I like to also put a few other rivets in the other holes just to keep everything lined up while setting the 1st couple of rivets)


Basically we just center the rivet (inside of the receiver so I couldn't get a good pic) on the flat ram tool head and smash the rivet nice and flat inside of the receiver - be sure that you have the receiver held down tight on the rivets head or you run the risk of swelling the rivet on the outside of the receiver and then IT WILL LOOK STUPID (see previous slide!) They send a couple of pieces of nice rubber with the AK Builder rivet jig to help square up the receiver and act as a 3rd hand - once again nice tools make the job so much more enjoyable!

Here is the flat rivets after they've been smashed with the flat tool head.


This is where the camera died - I have a few more pics but I was unable to upload them.


Edited by Togeneral98 (03/12/12 12:25 AM)
_________________________
Wes

Top
#289783 - 03/12/12 12:26 AM Re: AK-47 Build Tutorial - Very Pic Heavy!! [Re: Togeneral98]
Togeneral98 Offline
Resident Gun Nut

Registered: 08/03/10
Posts: 1796
Loc: Campbell County
City or County: Evington
UPDATE!!!

Ok so this is where we've left off.

We've:
-Bent the flat into a receiver
-Drilled the holes for the front trunnion
-Riveted in the front trunion

Man! it seemed like we got more done than this! - Take your time and go slow. It pays off in the end. I like to set aside about a weeks worth of afternoon tinker time wink

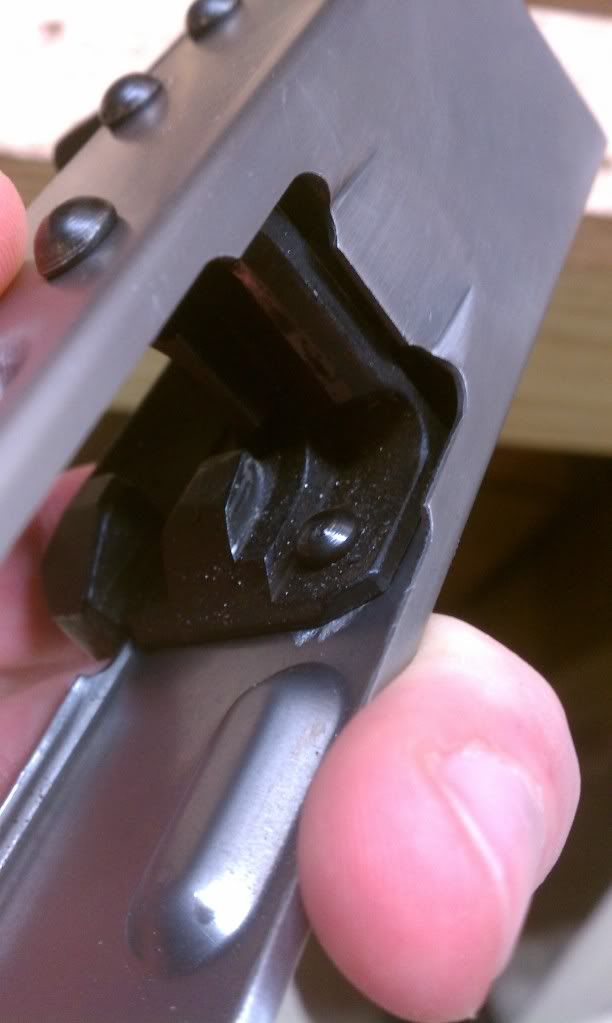
so here are some better pics of the flattened rivets inside of the front trunnion...
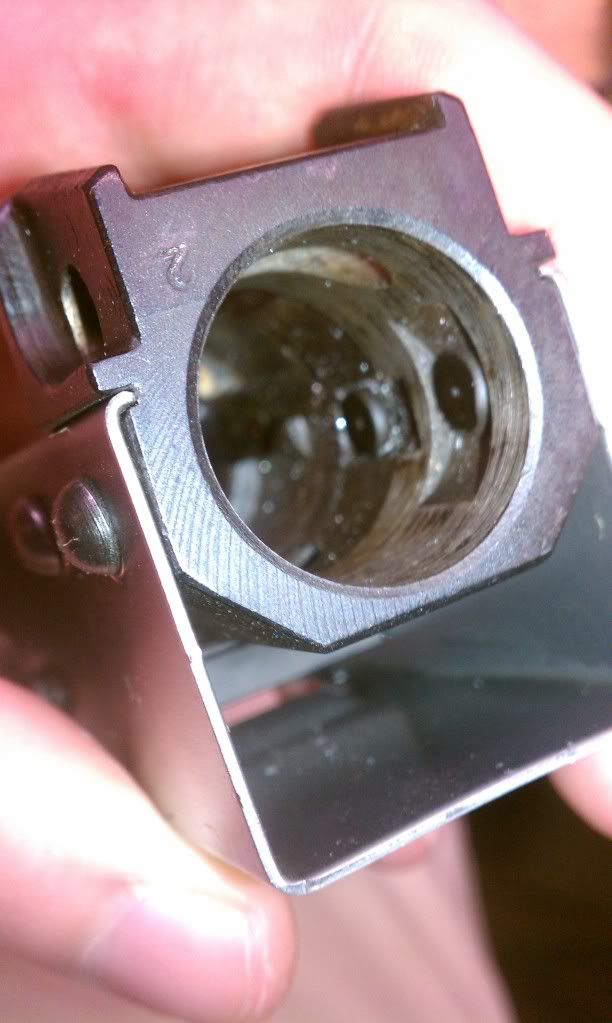


Notice that on the swell head rivets (pic on the right) we used the concave ram tool head and made a nice rounded top rivet - this is how the demilled trunnions come with their left in rivets so I like to make them look like the factory did (you know...even if they were putting them together with rocks and hammers in Iraq laugh )

Also notice how the swell neck rivets sit flush against the receiver - This keeps us from being the black sheep of the family and scorned by all of those around us!

Moving on.....

Here we have the parts of the trigger guard...
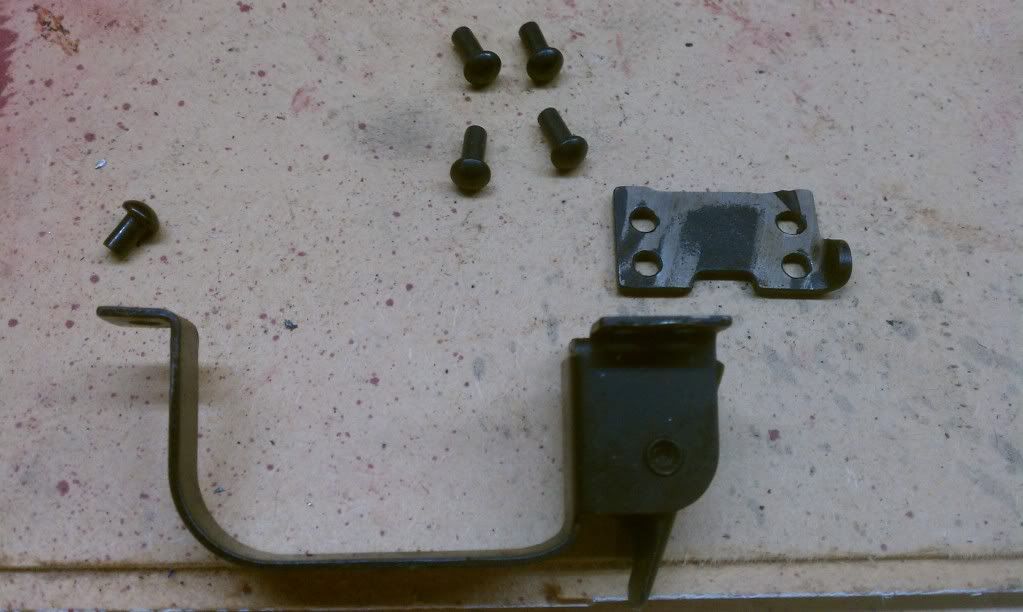

Here we have the trigger guard, the selector (or safety) stop and the rivets for the trigger guard.

Lets take a closer look at the rivets...
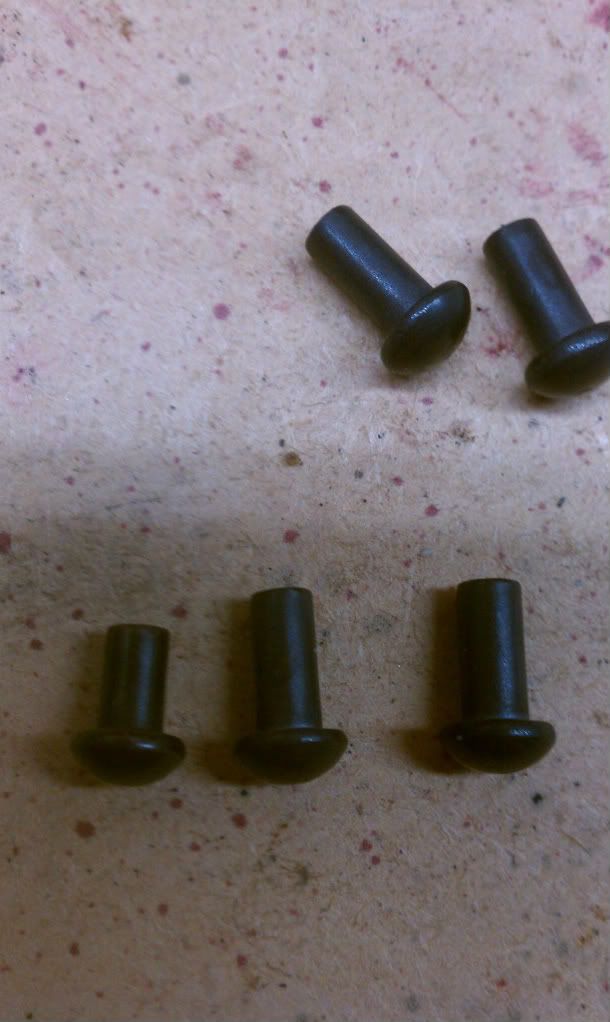


Notice how the one in the bottom left of the picture is shorter than the rest...this rivet is for the rear of the trigger guard.

The trigger guards function is to keep debris out of the trigger (aka Bang switch) to keep neglegent discharges to a minimum (no such thing as an accidental discharge!) The trigger guard also houses the spring-loaded magazine catch. The mag catch is assembled most of the time when you buy a parts kit - this is a good thing as if you break it or it comes in pieces they can be a real PITA to assemble!

Now back to the trigger guard and how it catches the magazine...if you look closely at this completed photo her you will see that the mad has a tab on the back and this will click up under the sping loaded catch when the mag is rocked into the receiver (hook the front of the mag into the front trunnion's lip and rock the mag upwards into the gun until the catch clicks)...

(I'll try to take a better pic of this tomorrow)
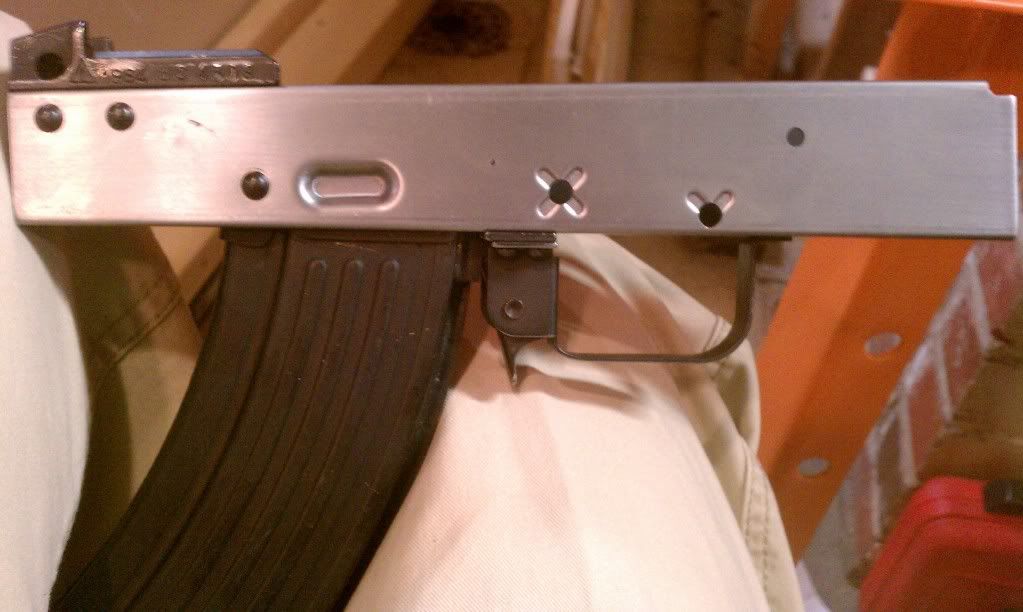


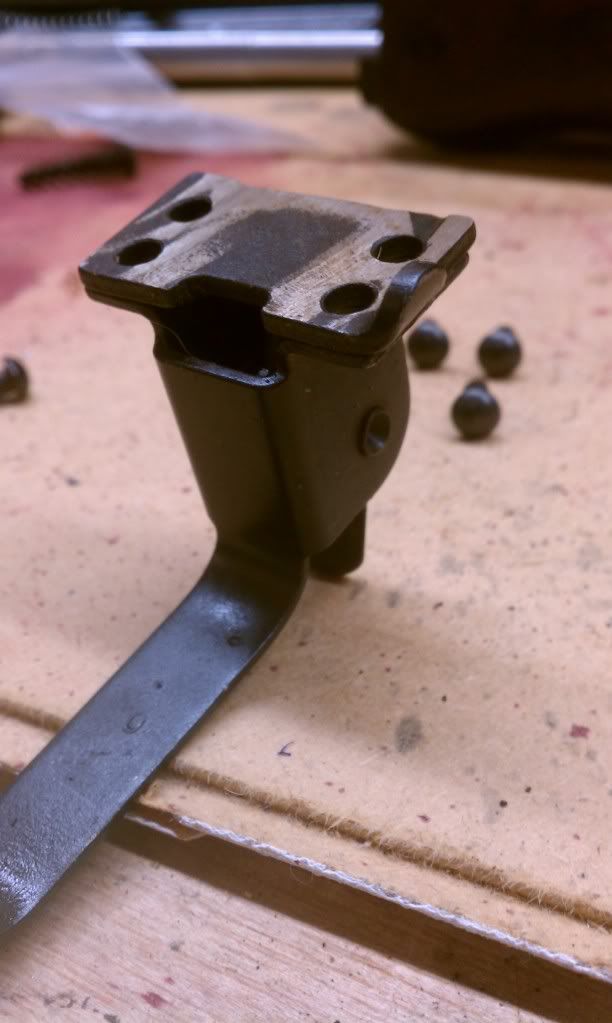
So now that we understand how this catch works we need to know that the selector stop is absolutely necessary! The selector stop thickness, when placed ontop of the trigger guard will put the catch lower along the underside of the receiver - if you forget to put the selector stop on the mag will never click into place!

This is how the stop is positioned - with the little tab facing upward on the right side of the gun (ejection port side, passenger side, etc.)


6 pic limit reached...see next slide...


Edited by Togeneral98 (03/12/12 10:41 PM)
_________________________
Wes

Top
#289784 - 03/12/12 12:26 AM Re: AK-47 Build Tutorial - Very Pic Heavy!! [Re: Togeneral98]
Togeneral98 Offline
Resident Gun Nut

Registered: 08/03/10
Posts: 1796
Loc: Campbell County
City or County: Evington
Now we understand the theory behind it so lets get 'r done!

Here is the AK Builder rivet tool (man, curtis needs to give me a discount for plugging all of his tools!)


The large block will hold the 4 front rivets in place (they are all set at the same time) and the flat plate is used to flatten the rivets while the larger block is used to provide the force to the flat plate (this will be clearer in a minute)

ok now we place the selector stop on the bottom of the receiver (remember the orientation!) then we put the trigger guard onto of it and put all 4 rivets in their holes at the front of the trigger guard (leave out the short rivet for now)


then you will slide everything into the jig lining up the rivet heads into their dimples on the jig...


now you will place the flat block ontop of the 4 rivets that are sticking up inside of the receiver...


Now we set our larger block ontop of the flat block making sure that the block will supply pressure evenly to all of the rivets (you just don't want anything to lean on you inside of the receiver)


Now you want to hold the receiver down onto the rivet heads to be sure that the swell only on the inside of the receiver and not on the outside or you will have a bad day frown

6 pic limit reached....see next slide....


Edited by Togeneral98 (03/12/12 10:52 PM)
_________________________
Wes

Top
#289785 - 03/12/12 12:26 AM Re: AK-47 Build Tutorial - Very Pic Heavy!! [Re: Togeneral98]
Togeneral98 Offline
Resident Gun Nut

Registered: 08/03/10
Posts: 1796
Loc: Campbell County
City or County: Evington
On now we press the rivets down. make sure nothing is moving on you and take your time - this goes fairly easily most of the time.

This is what they should look like when done (don't over do it or you will bend the receiver in ways that you don't want)


Now lets get on to that short SOB in the rear of the trigger guard...


Ok, now take note that our jig has a removable rear rivet dimple - this can be turned 2 different ways - you will want to arrange it so that it fits the triggerguard at the bend well with the rivet in place. This is how I set mine up...with the dimple shifted more towards the jig itself.


This rivet is a little trickier to flatten as the flat block will want to rock a bit - just try to set everything up as square as possible to the press ram and you should be ok - take your time and if things aren't working right stop and re-setup...here is my setup...


and here is the rivet when done - again don't over do it.


And here she is with the trigger guard finished!


Now we test out our magazine and see how it fits - with the AK builder flats I've been using they have been spot on with the fit!

6 pic limit reached....you know the drill!


Edited by Togeneral98 (03/12/12 11:01 PM)
_________________________
Wes

Top
#289786 - 03/12/12 12:26 AM Re: AK-47 Build Tutorial - Very Pic Heavy!! [Re: Togeneral98]
Togeneral98 Offline
Resident Gun Nut

Registered: 08/03/10
Posts: 1796
Loc: Campbell County
City or County: Evington
Now that we have the ability to put a mag in the gun lets tackle those lower receiver rails...


Now I had already modified these by cutting off the lower tab that I have found unnecessary on my 7.62x39 builds as their purpose is to prevent mag wobble, but the dimples in the receiver do an excellent job at that.

here is what they used to look like...


That little lip that goes about 1/3rd of the length of the rails on the bottom I cut clean off - you could leave it on, but then you will have to grind them down to fit the magazine...your choice

This is how I like to put in the lower rails, but AK Builder also sells a jig for this... I take a letter "G" drill and push it up inside of the receiver underneith the upper rail and butt the lower rail against it using the drill as a hard stop - then you butt the rail upto the front trunnion...


The rail with the ejector goes on the left side of the gun and the other rail goes on the right. This method has worked pretty well for me and I like it alot - cheap and simple.

Not you can clamp the rail into the receiver using a 1 or 2" c-clamp and then we break out our handy dandy Harbor freight spot welder!


This welder has a different lower tong (also from AK Builder) that allows you to get a good weld on the rails without shorting the welder out on anything you don't want to weld - this is a good thing! I like to set the welder on a 5 gallon bucket as it is easier to manipulate the receiver up off of the floor.

6 pic blah blah.....


Edited by Togeneral98 (03/12/12 11:17 PM)
_________________________
Wes

Top
#289787 - 03/12/12 12:26 AM Re: AK-47 Build Tutorial - Very Pic Heavy!! [Re: Togeneral98]
Togeneral98 Offline
Resident Gun Nut

Registered: 08/03/10
Posts: 1796
Loc: Campbell County
City or County: Evington
So now we weld...Unfortunately this is where I burnt the ever livin s#it outta myself and failed to take a picture of the actual welding, but here is the receiver afterwards...


I accidentally let one of the weld on this side get a bit hot and it burnded through so I will have to show you guys how I'll fix that later...


Just make sure that whatever you do/wherever you decide to put your 4 or 5 spot welds that you do not get too close to these small holes - this receiver is hardenable steel and you will heat treat these pilot holes and be S#it out of luck when you have to put in your center support!


Ok once we have spot welded in both rails and let the receiver cool down (DON'T DUNK IT IN WATER YOU WILL HURT THE WELDS!)

Ok, now that the rails are in and cool we are going to put the bolt and carrier into the receiver and see how much we need to trim the ejector blade so the bolt will clear...


This flat came with an ejector that had a funny hump in the middle of it and it hung up in the bolt so out came the dremel and it got ground down so the bolt could pass...


6 pic yadda yadda...


Edited by Togeneral98 (03/12/12 11:25 PM)
_________________________
Wes

Top
#289788 - 03/12/12 12:26 AM Re: AK-47 Build Tutorial - Very Pic Heavy!! [Re: Togeneral98]
Togeneral98 Offline
Resident Gun Nut

Registered: 08/03/10
Posts: 1796
Loc: Campbell County
City or County: Evington
Here is a better picture of that hump I am talking about - not sure if this is a new thing or not as neither of my other flats have had it...


From here we simply grind down the ejector until it is close and then file it for enough clearance for the bolt to pass without resistance (resistance from the ejector that is - the carrie may still be tight on the rails and we will fix this later)

This can be a long process, but it is important so take your time as you can't put metal back very easily...

keep trying the bolt and carrier until she fits...


Viola! now we have clearance and the bolt carrier can be slid all the way forward into the trunnion...


Well that is as far as I got tonight so here is your "moment of zen" until I get some more done - maybe tomorrow!


Nice!! Not Mine, but maybe one day...


Edited by Togeneral98 (03/12/12 11:42 PM)
_________________________
Wes

Top
#289789 - 03/12/12 12:26 AM Re: AK-47 Build Tutorial - Very Pic Heavy!! [Re: Togeneral98]
Togeneral98 Offline
Resident Gun Nut

Registered: 08/03/10
Posts: 1796
Loc: Campbell County
City or County: Evington
Ok back to the build!!!

I tend to get tunnel vision and because of this I tend to do just about everything to the recevier all at once (and this isn't really a bad thing) but this is by no means the only way to build the gun - although I highly recommend putting in the trigger guard before you put in the lower rails as you probably won't have any clearance for your flat block if you do it otherwise.

anyways...I am going to drill out our pilot drilled holes for the hammer and the center support - hammer holes first...


Since this hole will be reamer to 5mm we want to use a drill bit smaller than that (I believe I went with a .147" drill bit) you just want this hole bigger and all the way through the lower rail support - then we will ream it.

First we drill the hole...


and while I'm at it I normally drill the hole for the center support - but first we need to know what size hole to drill...so we measure the support rivet...


Now that we know what size it is wee need some clearance - I chose about .005" larger so ~.156" drill bit - This hole needs to go through both sides of the receiver - drill from one side at a time undersize (.130" or so) then come back with the .156" drill bit and pass through both holes at the same time...


6 pic deal...


Edited by Togeneral98 (03/14/12 11:35 PM)
_________________________
Wes

Top
#289790 - 03/12/12 12:27 AM Re: AK-47 Build Tutorial - Very Pic Heavy!! [Re: Togeneral98]
Togeneral98 Offline
Resident Gun Nut

Registered: 08/03/10
Posts: 1796
Loc: Campbell County
City or County: Evington
Ok, now that we have our holes drilled we need to ream each side of the hammer and trigger pin holes. Even though it's kinda obvious - the larger 7mm holes go on the left side of the recevier and the smaller 5mm holes are reamed on the right side of the receiver...I bought a set from AK Builder and never looked back , these things are great!...


So now that we have the holes reamed we have created a burr on the inside of the receiver - break out our dremel and buzz that bad boy smooth...


Now we clear out all of out holes and make sure that our center support rivet fits the hole we drilled for it...


6 Pics boys...


Edited by Togeneral98 (03/14/12 11:40 PM)
_________________________
Wes

Top
#289791 - 03/12/12 12:27 AM Re: AK-47 Build Tutorial - Very Pic Heavy!! [Re: Togeneral98]
Togeneral98 Offline
Resident Gun Nut

Registered: 08/03/10
Posts: 1796
Loc: Campbell County
City or County: Evington
alright, now we have all of that out of the way I like to install the barrel before we do anything else to the receiver just yet - easier IMO to set headspace without the center support getting in the way (and the bolt carriier can be slid easier if you bend the receiver outwards just a bit which would be very difficult if the center support was in right now.

Ok the way that I line the barrel up is like this...if your barrel is already machined for the handguard retainer then you can just put it on the barrel and lock it down - if it has almost no wobble (like mine did) then you can line up the flat part ontop of the retainer with the flat top of the trunnion...see very easy!

Now if you have a loose retainer then you can just put a round rod into the notch cut for the retainer and use it as a level and line up the rod with the flat top of the trunnion...


Before we have the barrel lined up we want to lube the crap out of the trunnion and the barrel tennon (part that goes into the trunnion) - like sex more is better in this case!!! laugh

Now we put the setup on our 12 - 20 ton press (I have a 12 and it works great for me. I use the AK Builder barrel press kit which has the little "T" shaped jig that has 2 screws used to level the receiver inline with the press's ram - you want this as close as you can get it or the press will try to kick sideways and try to bend your barrel...


Now we place a penny ontop of the muzzle to protect the crown and line up the ram...


Now we press the barrel in (this is the finished pic to show about how far the barrel will go into the trunnion - it will be almost flush on the front of the trunnion most of the time)


once we get the barrel in where we think it is good we will use our go and no-go gauges...this is a go gauge and the bolt just barely doesn't want to close...


so now we get to press the barrel back out just a tad..The tools to do this are also included with the little "T" jig...with the exception of the little silver piece that I have inserted into the chamber, this I made, but the jig set comes with a machined nut that does an ok job...


ok 6 pics...


Edited by Togeneral98 (03/14/12 11:56 PM)
_________________________
Wes

Top
#289792 - 03/12/12 12:27 AM Re: AK-47 Build Tutorial - Very Pic Heavy!! [Re: Togeneral98]
Togeneral98 Offline
Resident Gun Nut

Registered: 08/03/10
Posts: 1796
Loc: Campbell County
City or County: Evington
GRRR running out of room for my updates!!!

This is where putting all of that lube really helps out - if you skimped on the lube you will notice that the barrel will pop and bouce alot instead of gliding a bit smoother in and out and you will end up chasing the headspace (believe me I've done it - 30 min later it finally is acceptable)
once the headspace is good we check it with the bolt inside of the carrier....here is the no-go gauge...


And now the go gauge...


Once all is good we need to pin this barrel pronto or else your headspace could move - especially if you try to press on any barrel components...

Here I use another jig from the barrel press kit and my drill press and I use a bit slightly smaller than my barrel pin (.277") so I used a .272" drill bit (I started smaller though like .250")


Now we use the same jig on the press and push in the barrel pin...


Now our barrel is pressed on and pinned - NOW DOUBLE CHECK YOUR HEADSPACE TO MAKE SURE IT HASN'T MOVED!!!!!

6 pics fa la la la la....


Edited by Togeneral98 (03/15/12 12:03 AM)
_________________________
Wes

Top
#289793 - 03/12/12 12:27 AM Re: AK-47 Build Tutorial - Very Pic Heavy!! [Re: Togeneral98]
Togeneral98 Offline
Resident Gun Nut

Registered: 08/03/10
Posts: 1796
Loc: Campbell County
City or County: Evington
Now this is where we are....Barreled action - ready for heat treatment of the Fire control group holes and installation of the center support...


Not too shabby for about an hour or so's worth of work today....at least the thumb is feeling better...


More to come....


Edited by Togeneral98 (03/15/12 12:06 AM)
_________________________
Wes

Top
#289795 - 03/12/12 12:27 AM Re: AK-47 Build Tutorial - Very Pic Heavy!! [Re: Togeneral98]
Togeneral98 Offline
Resident Gun Nut

Registered: 08/03/10
Posts: 1796
Loc: Campbell County
City or County: Evington
Ok now that we have a barreled action let put some sights and a gas block on this bad boy.
But first I like to check everything that I can at this point in the build...so we try on the lower Handguard (HG) to make sure everything fits...


Now that everything fits we are going to press on our rear sight base...be sure to lube this and the barrel up like nobody's business...


Now we use our barrel jig parts to press the base on from the rear of the rifle...


you are going to line up the "Ears" of the rear sight base with the front trunnion like so...


and you press the sight on until the Ears are flush with the front trunnion...


Edited by Togeneral98 (03/18/12 12:34 PM)
_________________________
Wes

Top
#289796 - 03/12/12 12:27 AM Re: AK-47 Build Tutorial - Very Pic Heavy!! [Re: Togeneral98]
Togeneral98 Offline
Resident Gun Nut

Registered: 08/03/10
Posts: 1796
Loc: Campbell County
City or County: Evington
Now we once again check everything to make sure all fits well...


Now we are going to leave the gas tube on because we are going to use it to line up the gas block...


Now we push the gas block on until it looks about like this on the gas tube - you don't want to butt the block up completely to the tube as the tube might bind and then you on't be able to get it off .... eek


Now this is where we are now...


Now we have to get the front sight on straight...This is how I do it...I use 2 pieces of shim stock to level the front sight to the rear sight ...


as you can see in the above pic the front sight is a bit off - you want the 2 shim pieces to be level...once we get them lined up we use the same setup as when we pressed in the barrel but with a heavy piece of tubing on top to allow the sight to slide down the barrel...


Edited by Togeneral98 (03/18/12 12:47 PM)
_________________________
Wes

Top
#289903 - 03/12/12 10:12 AM Re: AK-47 Build Tutorial - Very Pic Heavy!! [Re: Togeneral98]
DrinaCorps Offline
7.62x39 junkie

Registered: 02/14/10
Posts: 1914
Loc: Lynchburg, VA.
City or County: Lynchburg
Great so far! I'm going to start a build soon on a Romy G kit, but starting with a NoDak Spud receiver. Hopefully, an MD-63 after that.
_________________________
Liberals are not the propellers of our society, they are the weed-fouled anchors.

Top
#290143 - 03/12/12 05:52 PM Re: AK-47 Build Tutorial - Very Pic Heavy!! [Re: DrinaCorps]
hiwaytahell Offline
Addicted

Registered: 09/11/09
Posts: 468
Loc: SW VA
City or County: Abingdon
Thanks Wes...you are the man.
_________________________
I do not have a license to kill...but I do have a learners permit.

Top
#290284 - 03/12/12 08:39 PM Re: AK-47 Build Tutorial - Very Pic Heavy!! [Re: hiwaytahell]
ktyhawk Offline
General Nuisance

Registered: 11/20/08
Posts: 3785
Loc: New Kent
City or County: New Kent County
Nice work on this. Should be a "sticky" when completed!
_________________________
FJB & C0.

Top
#290297 - 03/12/12 08:50 PM Re: AK-47 Build Tutorial - Very Pic Heavy!! [Re: ktyhawk]
JoeShmoe Offline
Full Auto

Registered: 12/07/11
Posts: 1524
Loc: va
City or County: fairfax
Thanks wes. Your pics and explanation of the process far exceeds anything I have watched on the tube or read. Best Thread yet!

Top
#290377 - 03/12/12 10:19 PM Re: AK-47 Build Tutorial - Very Pic Heavy!! [Re: JoeShmoe]
Togeneral98 Offline
Resident Gun Nut

Registered: 08/03/10
Posts: 1796
Loc: Campbell County
City or County: Evington
Next update!!!

This is how far we are trying to press the front sight on...


Now this is where we are so far...


Now remember that ugly spot I had from spot welding??...Here I ground out the ugly some and cleaned up any porosity that was still in the weld...


Now we put a lil mig weld in there to fill the void...


And once all is ground down and smoothed with the surrounding metal....


Now we're going to put in our center support... I like to put the flat side on the right side of the receiver and smash the other end on the left side of the receiver as it allows me the ability to make a nicer rivet head (no interference with the selector)


Edited by Togeneral98 (03/19/12 02:24 PM)
_________________________
Wes

Top
Page 1 of 3 1 2 3 >